The Tools You Need
Before you touch a wall, gather these. Most are cheap and will last a lifetime. Don't skip the stud finder or spirit level — they prevent the most common beginner mistakes.
- 🔨 Hammer
- 🔩 Electric drill/driver
- 🔦 Stud finder
- 📏 Spirit level (even a small one)
- 📐 Tape measure
- ✏️ Pencil
- 🖇️ Masking tape
- 🧲 Magnet (optional, for pipes/cables)
Use a pipe and cable detector (about £15–25 at Screwfix or B&Q). Drilling into a hidden electric cable or water pipe is genuinely dangerous and expensive to fix. Always scan the area first. Cables typically run vertically from sockets/switches and horizontally at set heights.
Drill Bit Basics
You'll need different bits for different materials. Most starter drill sets include these:
| Bit Type | Colour / Tip | Use For |
|---|---|---|
| Masonry bit | Usually grey, flat carbide tip | Brick, block, concrete, stone |
| Wood bit | Pointed tip, twisted flutes | Timber studs, MDF, wood |
| HSS (metal) bit | Black or silver, no pointed tip | Metal, plasterboard anchors |
| Multi-purpose bit | Often blue/yellow, pointed | Plasterboard, light masonry |
Know Your Wall Type
This is the most important thing to get right. The wrong fixing for the wrong wall is how things fall off — or worse, pull a chunk of plaster with them. Here's how to identify what you're dealing with.
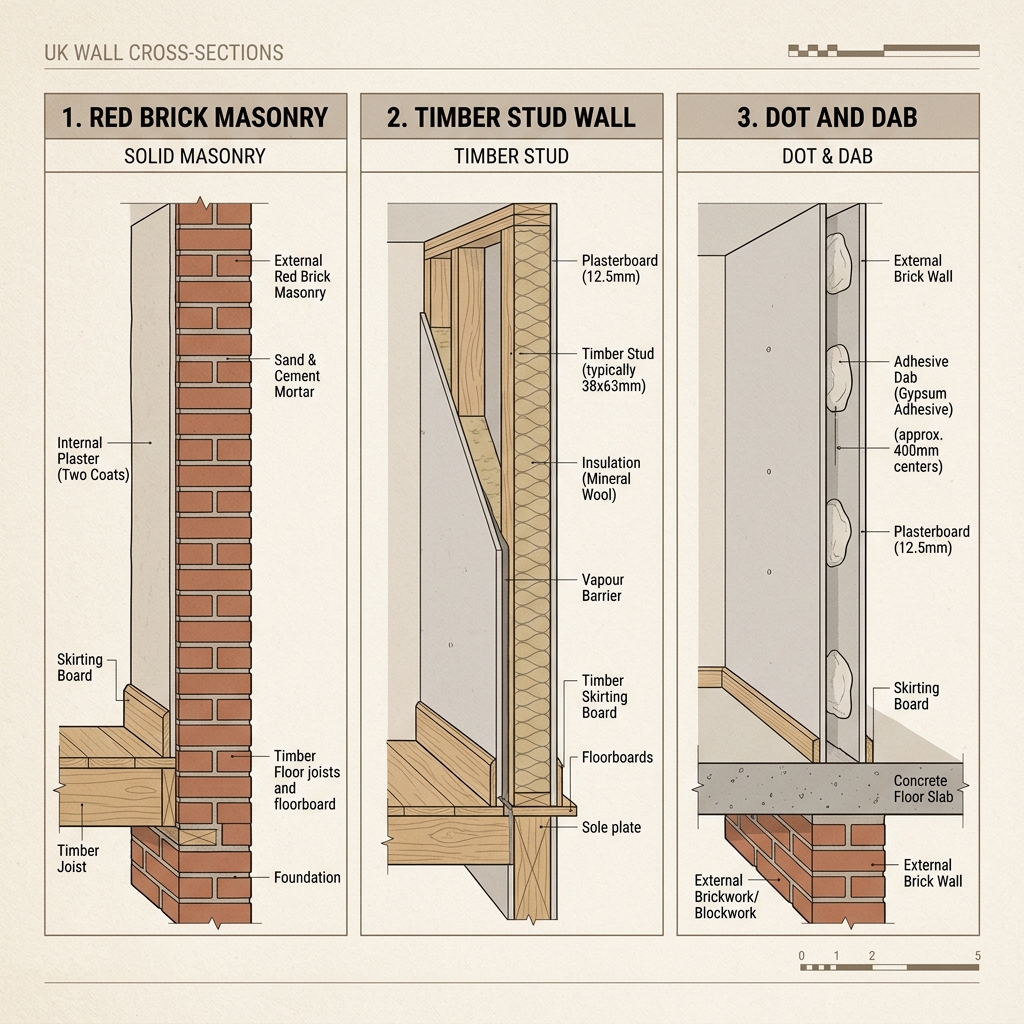
Visualizing Wall Structure: Masonry vs Stud vs Dot & Dab
Solid Brick or Block
Very common in UK homes, especially external walls and pre-1970s builds. Feels solid when knocked. Drill feels resistance all the way through. The strongest type — can hold almost anything.
Dot & Dab Plasterboard
Modern UK standard. Plasterboard fixed to a masonry wall using blobs of adhesive. Sounds hollow in spots, solid in others. Tricky — you need to hit the solid blobs or use specialist anchors.
Stud Wall (Timber Frame)
Internal partition walls. Plasterboard fixed to a timber frame. Completely hollow between studs (~400–600mm apart). Sounds hollow throughout. Screw into studs for strength.
Metal Stud (Modern Offices/Flats)
Like timber stud but with metal C-section uprights. Common in newer builds and commercial-to-residential conversions. Use plasterboard anchors or self-drilling fixings.
Lath & Plaster (Old Homes)
Pre-1950s. Thin wooden strips (laths) covered with several coats of plaster. Fragile. Drill slowly, don't hammer. Use the lath strips or find a stud behind.
Concrete / Dense Block
Mainly in flats and post-war builds. Very hard — you may need a hammer drill (SDS) for anything substantial. Use masonry anchors. Drill slowly to avoid cracking.
How to Tell What You Have
-
Knock on the wall
Hollow thud = plasterboard stud wall. Solid thunk = masonry or dot-and-dab. Dull thud in spots = dot-and-dab (the hollow bits are between the dabs).
-
Push a pin in a discreet spot
If it goes straight through easily, you have plasterboard. If it hits resistance after a few mm, it's masonry or a stud.
-
Check the age and location of your home
External walls in UK homes are almost always solid masonry. Internal walls vary. Pre-1950s = likely lath & plaster. Post-1970s = likely plasterboard stud or dot-and-dab.
-
Use a stud finder
Good models detect both studs and cables/pipes. Run it slowly across the wall. It'll beep when it finds a stud or density change. Mark both edges to find the centre.
Choosing the Right Fixing
The fixing is what actually holds your thing to the wall. Get this right and nothing comes off. Get it wrong and things fall. Here's your cheat sheet:
| Wall Type | Load | Fixing to Use | Notes |
|---|---|---|---|
| Solid masonry | Light | Plastic wall plug + screw (e.g. yellow/red Rawlplug) | Drill 6–8mm hole, tap plug in flush, drive screw |
| Solid masonry | Medium | Nylon frame fixing or longer masonry plug | Match plug size to drill bit; use 8–10mm |
| Solid masonry | Heavy | Chemical anchor (resin fixing) or expanding bolt | For shelves holding books, TVs, heavy mirrors |
| Plasterboard (stud wall) | Light | Hollow wall anchor (e.g. Gripit, Toggler) | No stud needed; rated weight usually printed on pack |
| Plasterboard (stud wall) | Medium–Heavy | Screw directly into timber stud | Find the stud with a finder; use 4mm wood screw 50–60mm long |
| Dot-and-dab plasterboard | Light | Hollow wall anchor (same as above) | Or drill through to masonry behind and use wall plug |
| Dot-and-dab plasterboard | Heavy | Long masonry bolt through plasterboard into wall behind | Use 100mm+ screw to reach the brick/block behind |
| Lath & plaster | Light | Picture hook nailed into lath, or plasterboard anchor | Drill carefully — old plaster cracks easily |
| Concrete | Heavy | Hammer drill + masonry plug + screw, or chemical anchor | Regular drills struggle — hire/borrow an SDS drill if needed |
Rawlplug, Fischer, and Gripit are the go-to UK brands found at B&Q, Screwfix, and Wickes. Packs are usually labelled by load rating (kg). When in doubt, go one size up — overspeccing a fixing costs pennies and adds peace of mind.
Understanding Plug Colours (Rawlplug Standard)
Yellow — 5mm hole
Very light loads. Picture hooks, small shelves, coat hooks with light coats.
Red — 6mm hole
Light to medium loads. Most common for everyday wall hooks, mirrors up to ~5kg.
Brown — 7mm hole
Medium loads. Curtain poles, heavier shelves, cabinet fixings.
Grey/Blue — 8–10mm hole
Heavy loads. TV brackets, floating shelves with books, large mirrors.
What You're Hanging
Different objects have very different requirements. Here's a quick-reference breakdown:
Pictures & Artwork
For anything under 5kg, a single picture hook (the kind you hammer a nail through at an angle) is often all you need on plaster over masonry. For heavier framed pieces, use two fixings spaced to match the picture wire or D-rings on the back. Use a spirit level across both — don't eyeball it.
Hold the frame against the wall where you want it, trace around it lightly in pencil, then measure where the hanging hardware sits relative to the frame top. Transfer those measurements to the wall. Drill with confidence.
Shelves
Shelves loaded with books or plants are one of the heaviest things most people hang. Always use two brackets minimum, fixed into studs or with heavy-duty hollow wall anchors. For a 900mm shelf, space brackets no more than 400mm from each end. Floating shelves (no visible bracket) use a French cleat or recessed rail — follow the specific product instructions, but still fix into studs where possible.
Mirrors
Heavy and often awkward. Most large mirrors come with two D-rings or a mirror plate on the back. Fix two screws at matching heights, hang the mirror, then slide it sideways so both D-rings sit on their screws. Use a spirit level before marking — a tilted mirror is very obvious. For anything over 10kg, use masonry fixings in a solid wall, not plasterboard anchors.
Curtain Poles & Blinds
These take consistent sideways and downward pull as you open and close them. Brackets must go into studs or masonry — never just plasterboard. Most poles come with wall brackets and screws; don't substitute smaller screws to be safe. Fix the end brackets first, then check everything is level before fixing the middle bracket.
Flat-Screen TVs
A 55" TV on a wall bracket is one of the riskier DIY jobs — the TV itself may only be 15kg, but the leverage on the fixings is significant. Always fix into studs (for a stud wall) or use M8 expanding masonry bolts in solid brick. Check the TV's VESA pattern (the bolt hole spacing on the back) before buying a bracket. Tilt/swivel brackets need especially solid fixing due to the extra leverage.
If you're not confident about the wall type or you're in a rented flat, it's genuinely worth paying a handyperson £50–80 to do this one. A fallen TV can hurt someone and cause serious damage.
Coat Hooks & Key Hooks
These seem simple but take a lot of lateral tugging. Use a backing board (a piece of timber screwed into studs, with hooks screwed to the timber) if the hooks are on a stud wall. On solid masonry, standard wall plugs and screws work well.
Clocks
Usually a single small hook or screw is fine. The only issue is getting the height right — measure up from the floor, not down from the ceiling, for consistency with other items.
The Step-by-Step Method
Follow this sequence every time and you'll rarely go wrong.
-
Decide position and mark it with masking tape
Stick a small piece of masking tape where you want to drill. It stops the drill bit from skidding on smooth plaster or tiles, and it's easy to remove cleanly. Mark your centre point with a pencil on the tape.
-
Scan for cables and pipes
Run your cable detector over the area. Pay special attention to anything directly above a socket, switch, or light fitting. If in doubt, move your position slightly rather than risk it.
-
Identify your wall type and choose your fixing
Use the knock test, pin test, or stud finder as described above. Select the appropriate wall plug and screw for the load — refer to the table in Section 03.
-
Set your drill depth
Hold the wall plug next to the drill bit and wrap a piece of masking tape around the bit at the same depth as the plug's length. This prevents you drilling too deep. Most plugs are 25–38mm long.
-
Drill the hole
For masonry: set your drill to hammer mode, start slowly to create a starter hole, then increase speed. Keep the drill perpendicular to the wall — don't angle it or the plug won't sit straight. Stop when your depth tape hits the wall surface.
-
Clear the dust
Blow out the hole or use a vacuum. Dust left in the hole stops the plug gripping properly.
-
Insert the wall plug
Push it in by hand until it's flush with the wall surface. If it's slightly loose, add a tiny dab of PVA glue around the plug. If the hole is too big, use the next size up plug or pack it with toothpicks and PVA.
-
Drive the screw
Use the correct screwdriver bit (usually PZ2 for wall screws). Drive it in firmly but don't overtighten — the plug needs to expand and grip. Stop when the screw head is snug against the wall or fitting. Give the fixing a firm tug test before hanging anything on it.
-
Hang and level
For items with two fixing points, hang loosely on both, use a spirit level to get it straight, then tighten everything up. Small adjustments: tap lightly with the heel of your hand to shift things a millimetre or two.
If your drill starts spinning but not cutting (you can smell burning), you've hit a piece of flint or hard aggregate in the mortar. Pull out, let it cool, and try at a slightly different spot just a few mm away. Don't force it — you'll blunt the bit or crack the plaster.
No-Drill Options
Renting? Don't want holes? For lighter items there are good alternatives. Just be honest about the weight limits — these are not substitutes for proper fixings on heavy things.
Command Strips (3M)
Adhesive strips rated up to 7.2kg per pair on smooth, painted surfaces. Remove cleanly by pulling the tab down slowly. Won't work on textured or freshly painted walls (wait 7 days after painting).
Adhesive Hooks
Good for coats, bags, light items. Command and Tesa are reliable brands. Check the weight rating. Not suitable for anything over ~3–5kg.
Magnetic Fixings
Only useful if you have metal surfaces (some modern radiators, steel panels). Strong rare-earth magnets can hold surprisingly well for small items.
Picture Ledges
A shelf with a lip that artworks lean against. One row of fixings, then you can swap artwork freely without making new holes. Popular option for renters.
Freestanding Solutions
Floor-to-ceiling tension poles (like those from IKEA or Umbra) for shelving. No fixings needed. Work well in alcoves and corners.
Furniture-Mounted
Hook over a door, clamp to a shelf edge, or rest against skirting board. For things like blanket ladders, some art displays, and plant hangers.
Common Mistakes & How to Avoid Them
| Mistake | What Happens | How to Avoid It |
|---|---|---|
| Wrong drill bit for wall type | Masonry bit skates on wood; wood bit burns out on brick | Identify the wall first; buy a mixed bit set |
| Drilling at an angle | Plug sits crooked; screw pulls out sideways | Look at drill from two angles; use a drill guide if unsure |
| Hole too big for plug | Plug spins and won't grip | Use the size up; or pack hole with matchsticks and PVA |
| Not clearing dust from hole | Plug grips poorly; fixing fails under load | Blow or vacuum the hole before inserting plug |
| Eyeballing level | Everything looks tilted after hanging | Always use a spirit level; even a phone app level is fine |
| Plasterboard anchor in dot-and-dab cavity | Anchor expands in the air gap behind, not in the board | Drill through to masonry; use a long bolt instead |
| Overtightening into masonry plugs | Plug cracks or pulls out under the screw | Stop when snug; the plug should expand, not compress |
| Hanging near hidden cables | Possible electrocution, power outage, fire | Always scan with a detector; never skip this step |
| Measuring from the wrong reference point | Hooks don't match across the room | Always measure up from the floor, not down from ceiling |
Quick Reference: Patching Mistakes
You will make mistakes. That's fine — walls are patchable. For small screw holes in plaster or plasterboard, use Polyfilla (a ready-mix filler from B&Q), press it in with a filling knife or even a finger, let it dry, then sand smooth and touch up with paint. For larger holes in plasterboard (up to about 50mm), use a mesh repair patch, skim over with filler, and sand once dry. Colour-matching paint is the hardest part — always keep a small pot of the wall paint when you decorate.
Measure twice, drill once. Everything in this guide comes back to that. Take an extra 60 seconds to double-check your marks before drilling, and most problems simply don't happen.